This is a place for FileKutz Creative Member's To Show off their project using FileKutz By LisaJane Design's. So welcome and take a look and these B.E.A..Utiful Projects and become inspired!!

Monday, October 10, 2011

Flower Petal Blossoms 2nd Tutorial "Black Rose" By Sharon S

Here is a 2nd tutorial for you using
FileKutz Design File "Flower Petal Blossoms"
By: Sharon S
"Black Rose"

FileKutz’s "Flower Petal Blossoms" is a must have file for everyone, you can purchase it for $1.99 at FileKutz Design's Shop.  Included in the file are many petals, stems and leaves to mix and match and make many different types of flowers.    I wanted to show you how easy it is to create a rose with part of the file. 

 I took the “heart” shaped petals and cut the whole group four times which will create one rose.   I chose several different leaves to cut out so that I can play with them and see which one I like the best for my project. 


I then used my piercer to punch a hole in the bottom of each heart shaped petal.  And then using a brad, I layered the petals on it starting first with the smallest set to the largest set. 
When you are done, it will look like this, I know, not much of a rose at this point, but stick with me here!! 
 I then started scrunching up the petals starting in the middle………


……and keep going until you have scrunched each petal.   I know, still not looking like a rose but trust me, it will. 
Then you take any skinny round tool you have like your piercer, a thin pencil or stick (I used a wooden skewer) and starting on the outside petals, roll each petal around the tool……….like pictured below.
Leave a couple petals scrunched in the middle to create the rose center.  You see, it has started to look like a rose now. 


I then added black diamond stickles to my rose and a couple of red “splatters” so I can use it for a new project coming up……stay tuned to the FILEKUTZ’s blogs or forums to see what the black rose has transformed into and how it will be used.  Thank you Sharon S, come visit me on my Blog for more creative ideas.


Pansy Flower Tutorial (Flower Blossoms New File)

Here is the 3rd tutorial using the New File
"Pansy Flower"


You will need a circle approximately 1 inch
3 large hearts cut at 1.2 x 1.27
2 small heart cut at 1.07 x 1.003
this totally depends on your finished flower
I inked all the edges and a bit in the
bottom center with blue
This just needs to be done to the front
as these will be glued to a card front
or a scrapbook  page and you 
will not see the backside
Then I inked the bottom center again with purple
I snipped just a tiny bit off of the bottom of
every petal (heart)
Using my zig glue pen I added a few "streakes"
to 2 of the petals
and added some glitter.  This totally depends
on how fancy you want to get. 
I manipulated ONLY the top of the petals
using my exacto knife rounded top
going in a circular motion
Then I shaped the petals in an outward motion
with my paper piercer
this is what the petals will look like.  The glittered petals
not do need to be manipulated as much.
Then I added a bit of score tape to the backside
of each petal towards the bottom.
This is what you will have
and started placing the glittered 
flowers first side by side
add your 2 smaller heart on each side of them
and then the last larger petal in the middle of them
I used my fine point black sharpie to add some
 lines inside the middle of each petal
and topped it off with a rhinestone
Here they are
really like the way these turned out.

Hope you enjoyed this tutorial and inspires you, visit Brenda B's Blog for more great creations.

Wednesday, September 28, 2011

Framed Paper


Good morning
Today I want to show you a quick and easy way to make a frame out of cardstock using a file from  LisaJane.  Since I've become a member of the DT I am loving all the crafty projects I've come up with for her using her files.
The frame measures 6 x 6
I got this using some pretty heavy 
cardstock with my E-Craft
Isn't the detail marvelous?
I added scoretape to 3 sides of the frame
and adhered it the the same colored 
cardstock as my backing
Then I cut a piece of the same cardstock
at 5 x 5.  This will be your frame stand.  
I scored it point to point and added 
scoretape to half of the stand
then adhered it to the backside of the frame.
I colored the flowers and leaves with 
some colored pencils to give it just
the right amount of coloring.
Since I wanted to use this black and white
photo of my kids when they were little
I didn't want the coloring to be overpowering
If you are interested in purchasing this file 
you can head over to her shop and grab it up.

Hugs


Thursday, September 22, 2011

Sneak Peak of Prizes for FileKutz Free File Challenge

Hi Everyone!! Hope all is going well! Well today I am posting to share with you a sneak peak of the PRIZES for the current FileKutz Free File Challenge, so don't forget to go get the free file and read the full post and entry rules HERE!

Must be entered in the Challenge by: midnight EST on Wed. Sept. 28th by Noon

AND HERE IT IS!! This is a  SNEAK PEAK OF THE ITEMS YOU WILL WIN FOR THIS CHALLENGE!! PLUS SOME more surprise items :)


Thursday, September 15, 2011

FileKutz Free File Sept 2011 Challenge

I am offering this freebie file of my Family Flourish Tree "Make a Page Kit" 

Read ALL the Details of the Challenge and get the freebie file HERE


Don't forget to check back mid-week next week on the Challenge Blog to see a sneak peak of the RAK scrapbook items the winner will receive!!

Up Next Month is Halloween MY FAV Holiday!! And I can't wait! Watch for 2 free files for the challenge next MONTH!! Plus more surprises :)

Friday, September 9, 2011

Snow Adorable

Good Morning and welcome to another card I made for LisaJane and the DT using file Lk00084 SnowBabies 1st Christmas. I am just so thrilled to be using these files because they are super easy to cut and put together. This card took me probably 20 minutes tops. I just love how this card turned out...I haven't made a long card in a long time but these two babies were just so adorable and I didn't want to lose any detail on them so here goes:

the card measures 7" x 4.25"

The SVG file is from LisaJane's Filekutz and since

I've become a
DT member here I can't get enough

of her files, they are so easy to cut and assemble.

I added the ends of cotton swabs for the pompoms

and then highlighted around her dress with my new

found love for the Gelly Roll glitter pen. Of course

I used Peachy Keen face stamps.

I cut all the pieces with my E-Craft and the tag also came

with my E-Craft software. I inked around the outside with blue,

and distressed the inside a bit with pink and used a

stamp from WinterPunnies. The snowflakes

were from my SCAL 3 Winter collection and cut with glitter paper.


Now I hope I've inspired you to make a Winter card because before you know it, you may need one ... it's getting chillier here everyday and I am not looking forward to that four letter word. (hehehehe)


Hugs
Brenda

Monday, September 5, 2011

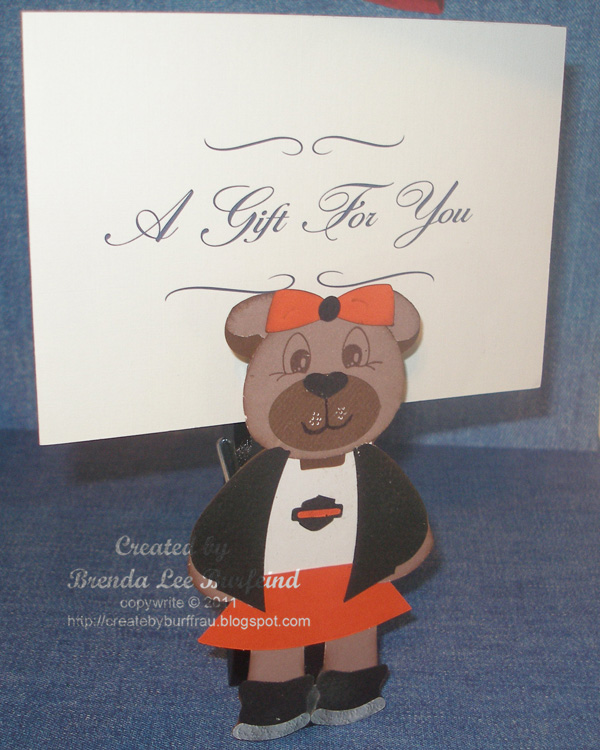
Photo Holder with Harley Tear Bears

Good morning and Happy Labor Day,

Here is project I did with LisaJane's files for the DT are simply fabulous and very easy to put together. This week I chose the Tanny Harley Girl Tear Bear and the Harley Tear Bear and if you click on the links it will take you directly to the store where you can purchase them. They come in all the formats for every kind of cutting machine, but they also comes in a pdf file for you to hand cut if you do not own a cutting machine. Now, I have to say these were one of the EASIEST cuts for using the E-Craft and definitely easier to put together. I am so thrilled how well the project worked out, so here we go:


I started out with some over sized clothes pins that I

got at Michael's in the dollar bin and painted them black.


I added the Harley Girl Bear to the front of

the clothespin with some red tacky tape.


Here is a side view. Make sure you attache your

cut to the clothespin upside down if that makes

sense to you, because you want to use it as

photo holder or in my case...


A gift card holder.


I added the Harley Boy Bear to the front of

the clothespin with some red tacky tape also.


I even had some scraps of jean paper in my stash.

Isn't he just adorable also?


Don't they make an awesome pair?

I am giving these as gifts to one of my very good friends,

both her and her husband own Harleys and I think

these will be cherished forever...


I hope you will continue to come back and


see more projects using Filekutz shop.


Hugs, Brenda