This is a place for FileKutz Creative Member's To Show off their project using FileKutz By LisaJane Design's. So welcome and take a look and these B.E.A..Utiful Projects and become inspired!!

Friday, October 28, 2011

Christmas Tear Bear

Good morning and welcome to another project using LisaJane's files.  I have to tell you that I am just thrilled beyond means to be on this DT.  I have never come across any easier files to put together than Filekutz.  This card literally (with cutting) took me about 15 minutes to put together and I just love it.
Isn't she cute?  The cut is from Filekutz and you can find it here.  LisaJane's files are so easy to put together and since I also love bears (almost as much as elephants) I cannot wait to get the whole set for the holidays.  Since I am on the Design Team at filekutz I get to show you lots of things and using LisaJane's files is a treat in itself for me.  I've had a few ideas running through my head and hopefully I can have this idea transfer to a project for you soon.  I added a Peacky Keen face to the bear and then some bling to her shoes and her Christmas hat.  I cut out the package that was on the background paper and popdotted to her.  A simple tag to complete the card and you can have it done in a matter of minutes.  

If you would like to check out my other projects, you can go here and find me.  Have a great day...Hugs, Brenda

Thursday, October 13, 2011

A Special DT Member in My Heart

I would like to take a minute to tell you about a special person to me, Kelly S she was one of my 1st DT members and has been with me for almost 2 years, I learned today that she lost her 38 year old husband, of 19 years, Keith on Oct 5th 2011. 

Please give her support in her time of need, she is a very active person in the craft world as I am sure a lot of you know.

 Kelly has been by me through everything since I started my DT Team, she was actually the 1st to sign on with me and she has supported me in bad and good times, she is a WONDERFUL card maker and I could not ask for a better Team member than Kelly, so Kelly if you do read this in the future, my heart and prayers are with you and Alex and I pray you get through this tough time with much support and the least heartache as possibale and know you are in my thoughts, Thank you for everything you have done for me and this DT Team. 

I am sharing a Halloween card Kelly has done for me, with you today, to show you how crafty this wonderful women is.

Here is what she had to say about her card: She posted this on her blog on Oct 3rd.
 This is a square 5x5 card, rather than my usual 5x7 card. It is based on a sketch provided by Creative Craft Challenges. The background paper is Green Crepe Ruche paper from the Paper Temptress. I love the texture of this paper! The patterned papers are from K & Company (the glittery orange swirls) and Cloud 9 Design (black swirly paper and orange paper with swirls). The Halloween ribbon is from Walmart. The cute little bats are from Filekutz by LisaJane Halloween Cutie faces, I used orange Stickles for their noses and added googly eyes. The smiles were drawn in with my white Sakura Gelly Roll pen. The sentiment is from K Andrew Designs (Fall-O-Ween Stamp Set). Orange rhinestones and buttons were added to finish the card.

"Batty For You" Halloween Card By Kelly S:


Monday, October 10, 2011

"Flower Petal Blossoms" New File SVG, KNK, WPC, AI, GSD File


Good Morning Everyone! FileKutz is releasing a new file today called "Flower Petal Blossoms".  This file was requested by a DT member and I am just so pleased with the results!


So I realeased it to the Creative DT and I am excited to show you what they came up with!  They did an awesome job with making these and decorating them.. I hope these inspire you to create your own!  Email me a 3d flower picture and details of what you did and used to make your handmade flower, using this file and you can choose 1 free file from FileKutz Designs of your choice!!!


Brenda B
Sharon S.


Von T.

Also they created a few tutorials for you to show you how they came up with thier beautiful flowers, so check them out, HERE under our tutorials Link.

If you would like to purchase this file you can here: Flower Petal Blossoms for $1.99

Ladies you all did a Great Job and Thank you for taking the time to build these and show off your great tutorials.  I greatly appricate all of you!

Garden Rose Tutorial (Flower Petal Blossoms New File)

Here is your 1st Tutorial for the New File
Garden Rose

You will need 12 large pears cut at 1 x 1.375
and 10 small pears cut at .7 x 1
a snowflake 2 x 1.7 (from FileKutz Snowflake Collection 1)
and two leaves 2.25 x 2.45
Ink all the edges front and back
the snowflake doesn't matter too
 much since you will not see it
cut the largest petal from the leaves off
I used the round top from my exacto knife to 
manipulate the petals and soften the paper.
Rub the paper in a circular motion
use your paper piercer to fold around in the middle
and then fold each side backwards
gives you this
Use your exacto knife again to manipulate the paper
of the snowflake also in a circular motion
You will end up with a cup of sort
again, manipulate the leaves
I use my embossing roller to create stems
and veins 
I use hot glue (my preference) but you can use
any quick dry glue to attach the petals to 
the snowflake cup
add to each of the 6 points of the snowflake
in a layered pattern
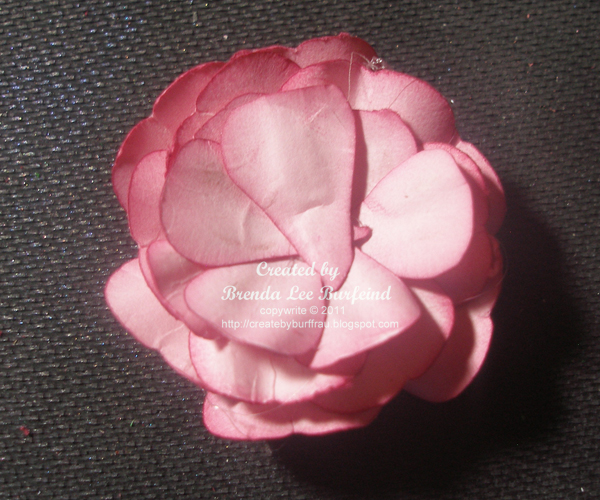
1st layer completed
now start with the 2nd layer and offset the 
petals using the rest of the 6 large pear petals
finished 2nd layer
now start with the next 8 small pears and layer
them on top of the larger pears
keep going around until they are all used up
you should have 2 small pears left
wrap them around your paper piercer
pretty tightly
gives you this
insert one petal into the other one
snip a bit off the end depending how deep you
want your middle to be...
hot glue into the center of the flower
squish...don't be shy, the hot glue holds
it together firmly, but you need to manipulate
the flower to your liking
I squished from both sides
then cup the flower in your hand
and squish again until you like
the fullness
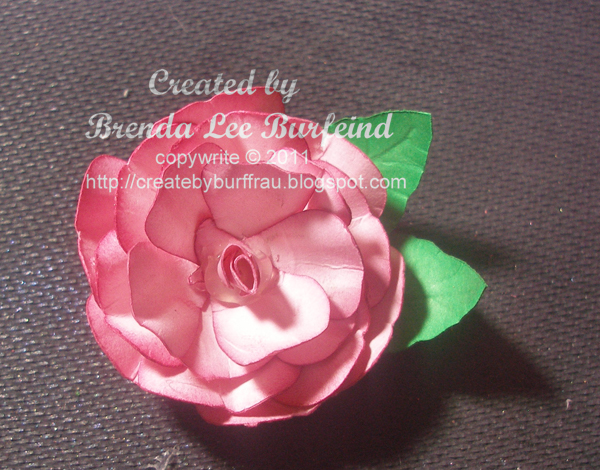
add a bit of hot glue to the stem of the leaves
and here is your 3d rose
side view
top side

Hope you enjoyed this tutorial and come visit Brenda B.'s Blog for more great creations

Flower Petal Blossoms 2nd Tutorial "Black Rose" By Sharon S

Here is a 2nd tutorial for you using
FileKutz Design File "Flower Petal Blossoms"
By: Sharon S
"Black Rose"

FileKutz’s "Flower Petal Blossoms" is a must have file for everyone, you can purchase it for $1.99 at FileKutz Design's Shop.  Included in the file are many petals, stems and leaves to mix and match and make many different types of flowers.    I wanted to show you how easy it is to create a rose with part of the file. 

 I took the “heart” shaped petals and cut the whole group four times which will create one rose.   I chose several different leaves to cut out so that I can play with them and see which one I like the best for my project. 


I then used my piercer to punch a hole in the bottom of each heart shaped petal.  And then using a brad, I layered the petals on it starting first with the smallest set to the largest set. 
When you are done, it will look like this, I know, not much of a rose at this point, but stick with me here!! 
 I then started scrunching up the petals starting in the middle………


……and keep going until you have scrunched each petal.   I know, still not looking like a rose but trust me, it will. 
Then you take any skinny round tool you have like your piercer, a thin pencil or stick (I used a wooden skewer) and starting on the outside petals, roll each petal around the tool……….like pictured below.
Leave a couple petals scrunched in the middle to create the rose center.  You see, it has started to look like a rose now. 


I then added black diamond stickles to my rose and a couple of red “splatters” so I can use it for a new project coming up……stay tuned to the FILEKUTZ’s blogs or forums to see what the black rose has transformed into and how it will be used.  Thank you Sharon S, come visit me on my Blog for more creative ideas.


Pansy Flower Tutorial (Flower Blossoms New File)

Here is the 3rd tutorial using the New File
"Pansy Flower"


You will need a circle approximately 1 inch
3 large hearts cut at 1.2 x 1.27
2 small heart cut at 1.07 x 1.003
this totally depends on your finished flower
I inked all the edges and a bit in the
bottom center with blue
This just needs to be done to the front
as these will be glued to a card front
or a scrapbook  page and you 
will not see the backside
Then I inked the bottom center again with purple
I snipped just a tiny bit off of the bottom of
every petal (heart)
Using my zig glue pen I added a few "streakes"
to 2 of the petals
and added some glitter.  This totally depends
on how fancy you want to get. 
I manipulated ONLY the top of the petals
using my exacto knife rounded top
going in a circular motion
Then I shaped the petals in an outward motion
with my paper piercer
this is what the petals will look like.  The glittered petals
not do need to be manipulated as much.
Then I added a bit of score tape to the backside
of each petal towards the bottom.
This is what you will have
and started placing the glittered 
flowers first side by side
add your 2 smaller heart on each side of them
and then the last larger petal in the middle of them
I used my fine point black sharpie to add some
 lines inside the middle of each petal
and topped it off with a rhinestone
Here they are
really like the way these turned out.

Hope you enjoyed this tutorial and inspires you, visit Brenda B's Blog for more great creations.